As a reminder, Paula Watts Photography will be available for summer scheduling in the United States from June through August. If you have any photographic needs for the summertime, please don’t hesitate to send your requests now.
With limited time and availability, we ask that you make your requests for proposals as soon as possible in order to ensure that your needs are met.
As a professional photographer, understanding, discerning and controlling light is one of the most crucial elements for producing captivating imagery. No matter the subject matter, no matter the project. In the creative world of professional photography, there is an element of subjectivity. Do I want a moody emotion to portray our concept or do I want a bright airy feel to the image? Working closely with creative directors, designers, and clients, understanding the intention of the image and creating a mood and feeling for the audience is the end result, but taking the concept and turning that it in to a tangible product can’t happen without knowing lighting.
Here are a few tips to help understand lighting better. Whether you’re a novice photographer looking to improve your skills, a creative director who would like to better articulate your needs to your photographer, or whether you’re a client looking to understand the photography world a little better, these 3 tips will help.
1. Watch for shadows and highlights.
As you go throughout your day, look at what different light sources are doing. Is your desk lamp creating a hard shadow because it’s a bare bulb? Do your white curtains cause really soft shadows on your couch? Do the patterns from your stairs or blinds cause different shaped shadows? I know, these questions might seem elementary, but as soon as you start recognizing what different types of light sources do to create different types of shadows and highlights, the easier you can start re-creating it. There are many different types of light, which cause different shadows. You can use it to your benefit and alter light with precision. Harsh light with direct shadows, soft light with diffused shadows. These help create a mood. Ask yourself if you want a mysterious image; having harsh shadows with very little detail in the shadow area can help create the right mood. If you want a cheerful image, having little shadows with soft light might help brighten it up.
Strategically placing the light to the side of the subject with little fill light, will help in the drama and emotion of an image.
2. Look through magazines and try to recognize light direction and quality.
When I was being trained at Brooks Institute of Photography, one of my first lighting assignments was to put a binder together of all the different types of lighting (light quality) and light direction. My teacher literally gave me a list of 50 or so lighting demands to fulfill. For example, an image using a 1:4 lighting ratio with the light coming from camera right. Diffused light coming from behind the camera. (Gap Baby uses this technique often). Rim light, butterfly light, Rembrandt etc etc. The list went on. It was amazing. What it did was teach me to see light and all its effects in order to mimic it myself as well as learn the vastness of its uses. I think I even still have the binder, in fact. The quality of light refers to its harshness. Do you want a very soft light or a direct light? If you wanted to photograph an interrogation room, chances are, the light would be from above with a bare bulb. It’s not flattering for a portrait, but it’s emotional and harsh, conveying the appropriate emotion. If you wanted to photograph a Charmin ad, talking about the softness of the toilet paper, soft, diffused lighting would help convey that better. Light direction helps to determine where shadows land as well as what aspects of the subject to highlight. For instance, if I’m photographing food, I want a lot texture, which is not going to be achieved by putting the light right above my camera (on camera flash) or behind me. It might be soft light or hard light, but it won’t get the appropriate look because of the light direction and placement.
Utilizing light from a specific direction to accentuate the design and connection within the room.
3. Try to be intentional about seeing lighting color temperatures.
Lighting temperature is another way to control your lighting effects and convey the message of your client. There are many different color temperatures, measured by the Kelvin temperature scale. An easy way to describe a basic temperature is warm or cool. If you are photographing an iceberg for Patagonia outdoor gear, you may not decide to put that warming gel on your lights to warm things up. Perhaps, a warm light would be appropriate for a cozy fireplace scene with a glass of brandy. Do you get the distinction? Understanding color temperature and utilizing it or altering it will help create a more concise message in the photograph. Not to mention appropriate color balance. In addition, there are always lights in various locations that a photographer will need to balance or work around. For instance, overhead fluorescent lights do not create flattering light for a portrait. If you need to photograph an executive in a boardroom, however, learning to either work around the fluorescent tube, overpowering the green-tinted light, or putting a gel over the light will be a necessary decision for the photographer to make. Balancing color temperature is necessary in order to avoid having a green tinted CEO, looking sick to the stomach.
My client wanted a warm and soft image to show the connection between the horse and trainer to emphasize their branding which involves a nostalgic warm appeal.
In short, I can’t stress enough how important knowing and controlling light truly is for photographers, or for choosing a knowledgeable photographer for your next project. If you have any questions or would like to keep this discussion going, please feel free to comment below. It’s kind of a passion of mine, and would love to “geek” out with some more lighting talk.
//Want to see more on lighting? Check out this previous post with a cool before/after : lightingmatters
“Being clear about what we’re doing and why is the first step in doing it better. If you’re not happy about the honest answer to this question, make substantial changes until you are.” Seth Godin. Jan 15, 2013
Not a day goes by when I don’t have the extreme privilege of hearing stories of young Tibetans fleeing the Chinese government’s occupation of their land. The stories are shocking, filled with bravery, a fight for freedom and many times, end in tragedy. Just today, a friend of mine told me his story of crossing the Himalayan Mountains (as they all do in order to get to India). He told me of being captured by the Chinese government the first 3 times he tried to escape, put in prison and then returned him to his home. The fourth and final time, he travelled for multiple weeks over the mountains, with some dying along the way. Food runs out, the temperatures are freezing, there are unmarked paths with dangerous cliffs. One young man fell to his death during their journey.
I want to help. This has inspired me to start a documentary project of these young adults, coming from Tibet, as refugees, holding on to their culture, learning for the first time about their country’s history (as it is mostly banned in Tibet to learn of their own history), all the while trying to embrace their new surroundings in India, separated from their families and from the way of life they’re accustomed to. A beautiful mixture of tradition and modern appeals. Starting a new life…. with “Refugee Status”.
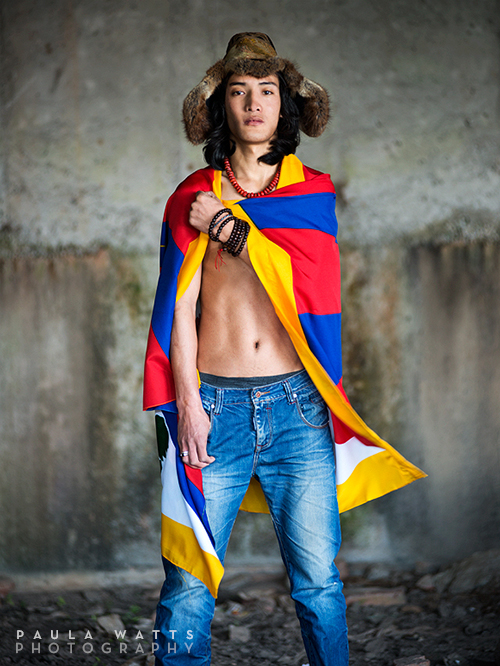
This is the first image of the series.
(Sengye, shown above, is a young Tibetan man from the Amdo region of Tibet. He wears a traditional fur hat and necklace, identifying him as Amdo. He was raised in a nomadic family (as most are in that region), breeding yaks, sheeps and goats. He fled Tibet on the same night of his father’s return from being imprisoned by the Chinese government for 14 years. They didn’t see each other.)
Please feel free to share your thoughts, input and comments.

After spending 6 months on a trip
around the world, the last three in Africa, my eyes have been open to the opportunities to help others less fortunate. My husband and I spent those 3 months working in a township called Red Hill, living amongst the Xhosa people. Yes, we lived in a “squatter camp” in a shack, and loved every moment of it… well, almost. We were able to help the people living there rebuild their homes after a huge fire that destroyed all of what meager possessions they had. Our team built 79 homes in 2 short months and witnessed changes in people that last a lifetime. Here are a couple images of the faces I saw on a daily basis. Unforgettable!
Are you looking for a professional architectural photographer, but just don’t know where to start? Or, perhaps, you are using a photographer that specializes in portraits, and you don’t know the difference? If this is you, this article is for YOU!
No matter what profession you are in, educating your clients in your field is so important. Not only will they understand where you are coming from in regards to expertise, costs associated, etc, but, they will be able to better realize why they even need your services in the first place. Same goes with photographers. I dare say, even more so with photographers, but then again, I am biased.
With the help of the AIA (American Institute of Architects) and the ASMP (American Society of Media Photographers), this article helps iron out key points to finding an architectural photographer that not only meets your needs, but with the proper quality and expertise.
If you have any further questions regarding architectural photography or finding a photographer that fits you, please feel free to email at info@paulawattsphoto.comor call at#541-255-5834
I was recently hired to go to Norway to be a co-host of a food/travel TV show and to photograph the food and culture of the Norwegian Cuisine. I came away with some great photos that incorporate the lifestyle and passion behind the chefs and dining experience. Here is just a sneak peak at some of my favorites. The trip ranged from visiting some of the top chefs in Norway and their restaurants to going to the fish market or seeing a chef’s eye’s light up as they smell the freshly picked mushrooms from a nearby mountainside. (picture shown). The last picture shown is of a Sami man (indigenous Norwegian people) cook us Reindeer stew right over an open fire and sitting on reindeer skin. If I wasn’t there myself, I’d think it was unbelievable! For the show, my husband and I were also taken around the country just like tourists to see the culture and picturesque scenery of beautiful Norway. What an awesome experience!